Table of Contents
Creating Tickets |
Creating Tickets: Slack with Halp |
Creating Tickets: Zendesk |
Using Slack Threads with Halp |
Managing Tickets |
Time Tracking
Summary
We have 3 ways to offer support and track issues for our customers:
Slack
Halp
Zendesk
Here we will focus on how to use Dev Slack and Zendesk. We are not going to cover Halp because the only reasons why we have the Halp integration is to:
Create tickets from Slack in Zendesk.
Record conversation threads in Slack on those tickets in Zendesk.
While Halp does offer a basic ticketing service, we will not be using any of Halp’s services other than as a bridge between Slack and Zendesk
Items to be addressed
Monday <-> Zendesk Integration
Github <-> Zendesk Integration
Monday<->Github Integration
Define Zendesk's Type and Priority
Definitions
Slack
We have 2 Slack workspaces:
Zestyiodevs
Zesty-io
Our Zestyiodevs workspace is open to all of our users - all they have to do is sign up at chat.zesty.io. When communicating in Dev Slack be sure to follow our support guidelines outlined in this doc.
Users can also create tickets on our internal Zesty-io Slack workspace.
Zendesk
Zendesk is our support ticket system. It is replacing Freshdesk. This is where we manage support tickets.
Agents
Dominic
Gisele
Kim
Randy
Stuart
Halp
Agents
- Kim
Creating Tickets and Managing Tickets
Creating Tickets
When a user posts an issue in Dev Slack it’s best to immediately create a ticket, instead of triaging, and only creating an issue once you believe a ticket should be created. When a ticket is created immediately the whole conversation can be recorded in Zendesk (via Halp). And then if the ticket needs to be passed to another team member, the triage history is readily available, which will hopefully, save time spent discussing what the issue is and what has been tried to resolve it between team members. That said, it's best to avoid creating tickets in Zendesk unless absolutely necessary (e.g customer emails or calls about an issue).
This is a brief overview of how to create a ticket. Please see the steps below for more detailed instructions.
Note:
- Non Halp/Zendesk agents can create tickets using Halp commands in Slack
- Non-Halp/Zendesk agents who create tickets with slash commands cannot interact with the ticket after it’s been created therefore it’s very important to create a ticket by reacting with an emoji
- When non-Halp/Zendesk agents create a ticket, that ticket might need reassigned to another user or have the requestor updated. This will need to be done by a Zendesk agent.
- When a non-Halp/Zendesk agent responds on a thread on the ticket they created they may be added on CC in Zendesk. Zendesk agents need to watch for this to avoid sending unnecessary emails.
- When a user is removed from CC, and later re-added (or other user is added to CC) - the whole conversation thread will be revealed to the user on CC whether they were CC'd on an earlier message or not. CC users with caution. If you don't want a detail(s) revealed - enter them as internal notes.
- When non-Halp/Zendesk agents resolve a ticket in a Slack thread they can @ a Zendesk agent to let them know that the ticket can be closed in Zendesk.
- When non-Halp/Zendesk users create tickets, it is up to the Support team to triage and follow up with the requester.
Creating tickets in Slack using Halp
Even though you might not be an agent in Halp, you can still create tickets using one of the following methods:
Note: Halp must be added to a channel before you can use Halp to create a ticket
Post
/support [ description of issue ]Post
/halp [ description of issue]React to a post in Slack with the
:ticket:emoji (Do not create a thread - simply react with a:ticket:emoji to a post).
Special notes on different methods of creating tickets
When a ticket is created via Halp slash commands - the conversation is no longer tracked in Slack thread with the customer, but it’s tracked via responses sent/received in Zendesk. If there is an existing thread that requires a support ticket to be created you must use method 1 or 2.
The most efficient way to create a ticket is to add a :ticket: emoji to a post. Tickets cannot be created in Slack threads therefore it's imperative to use this method to create a ticket from the first post user makes. Once a ticket emoji has been added to a post do not remove it. If the ticket was mistakenly made then ask a Zendesk agent to close or delete it.
Creating Tickets with Halp
Creating a ticket with /support or /halp
1. Use the slash command to post a message in Dev Slack: /support [description of issue] OR /halp [description of issue]. Once you've added a general description hit enter to send your message. 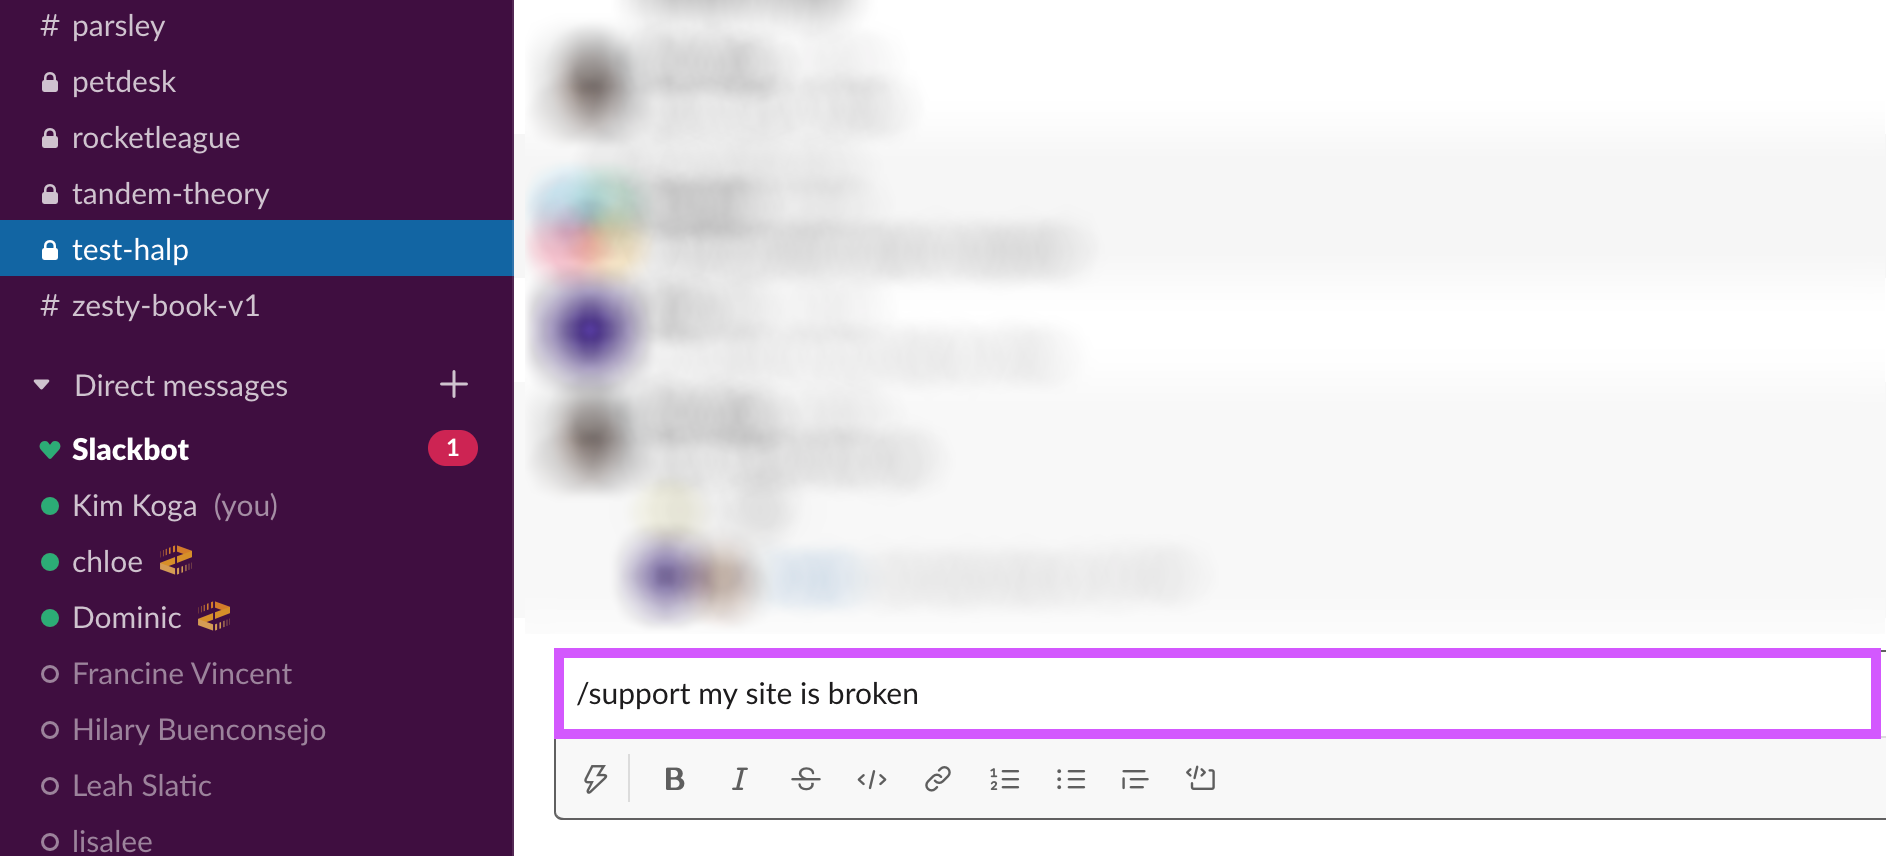
2. The Halp bot will prompt you to choose one of several options. Choose 'Create Ticket'. Note: if you're not a Halp agent you may not see all these options. 
3. Fill out the General Request modal to create a ticket. 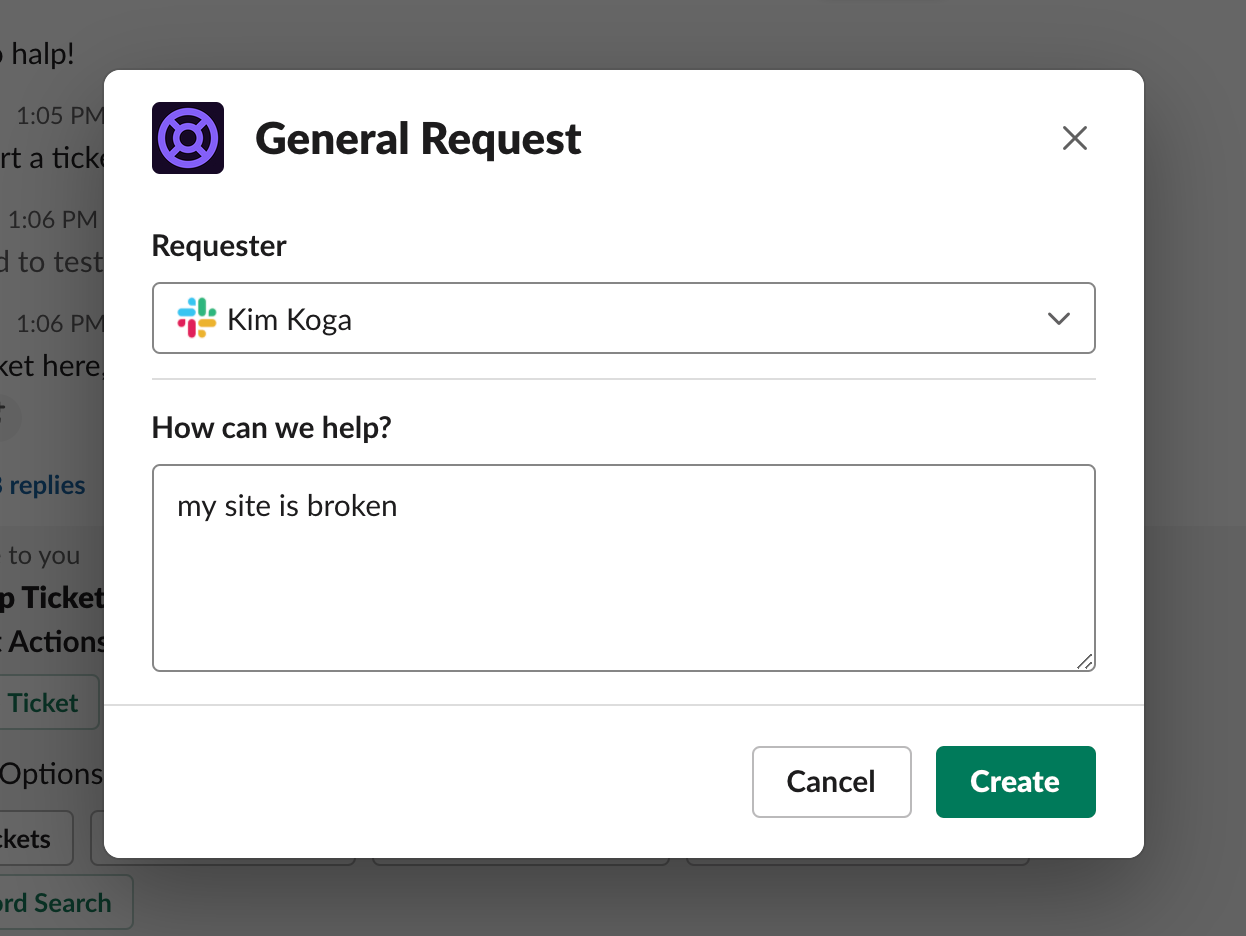
3a. For the first field, Requester, select a user from Slack. In the second field, How can we help?, write a description of the issue. There is a limited character count but describe the issue in as much detail as possible within these constraints. When you're ready, click 'Create' to create the ticket. 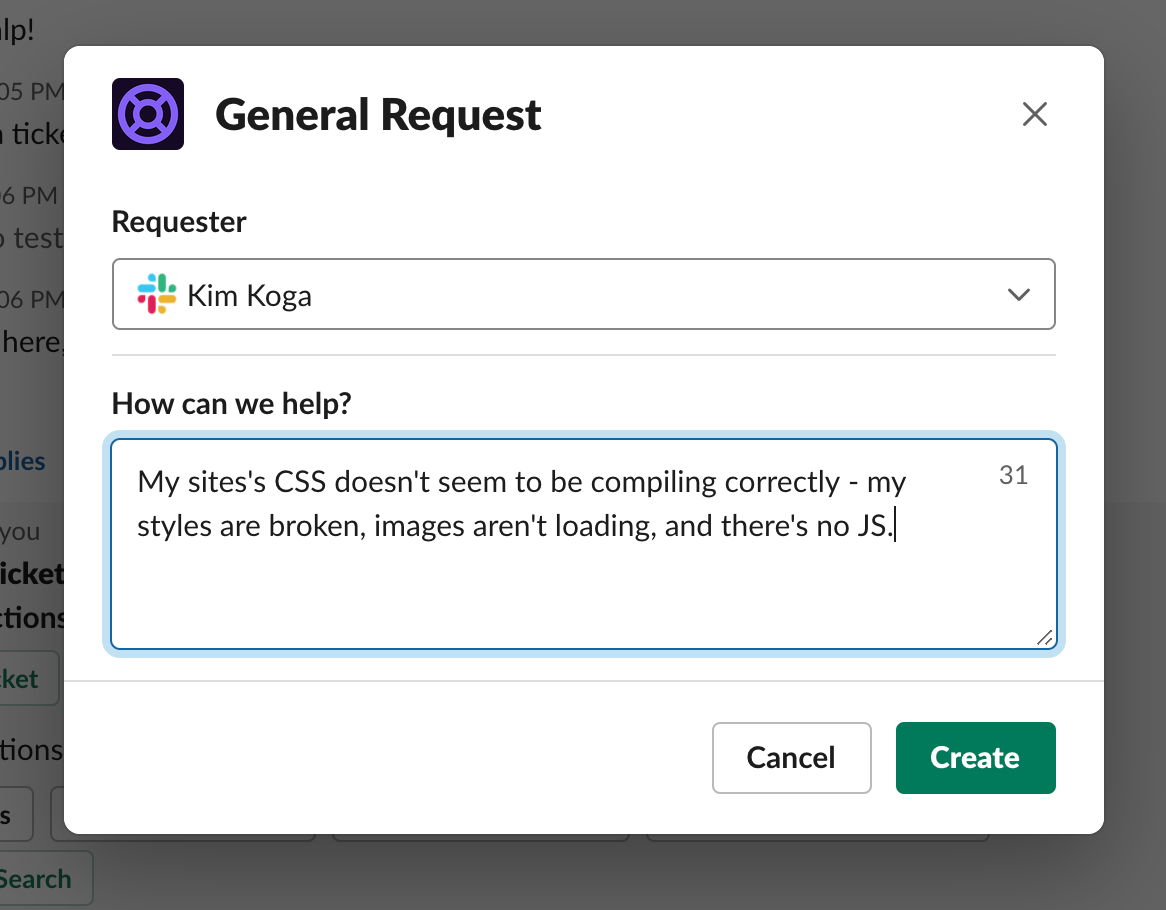
3b. This field will be come the body of the Zendesk ticket. 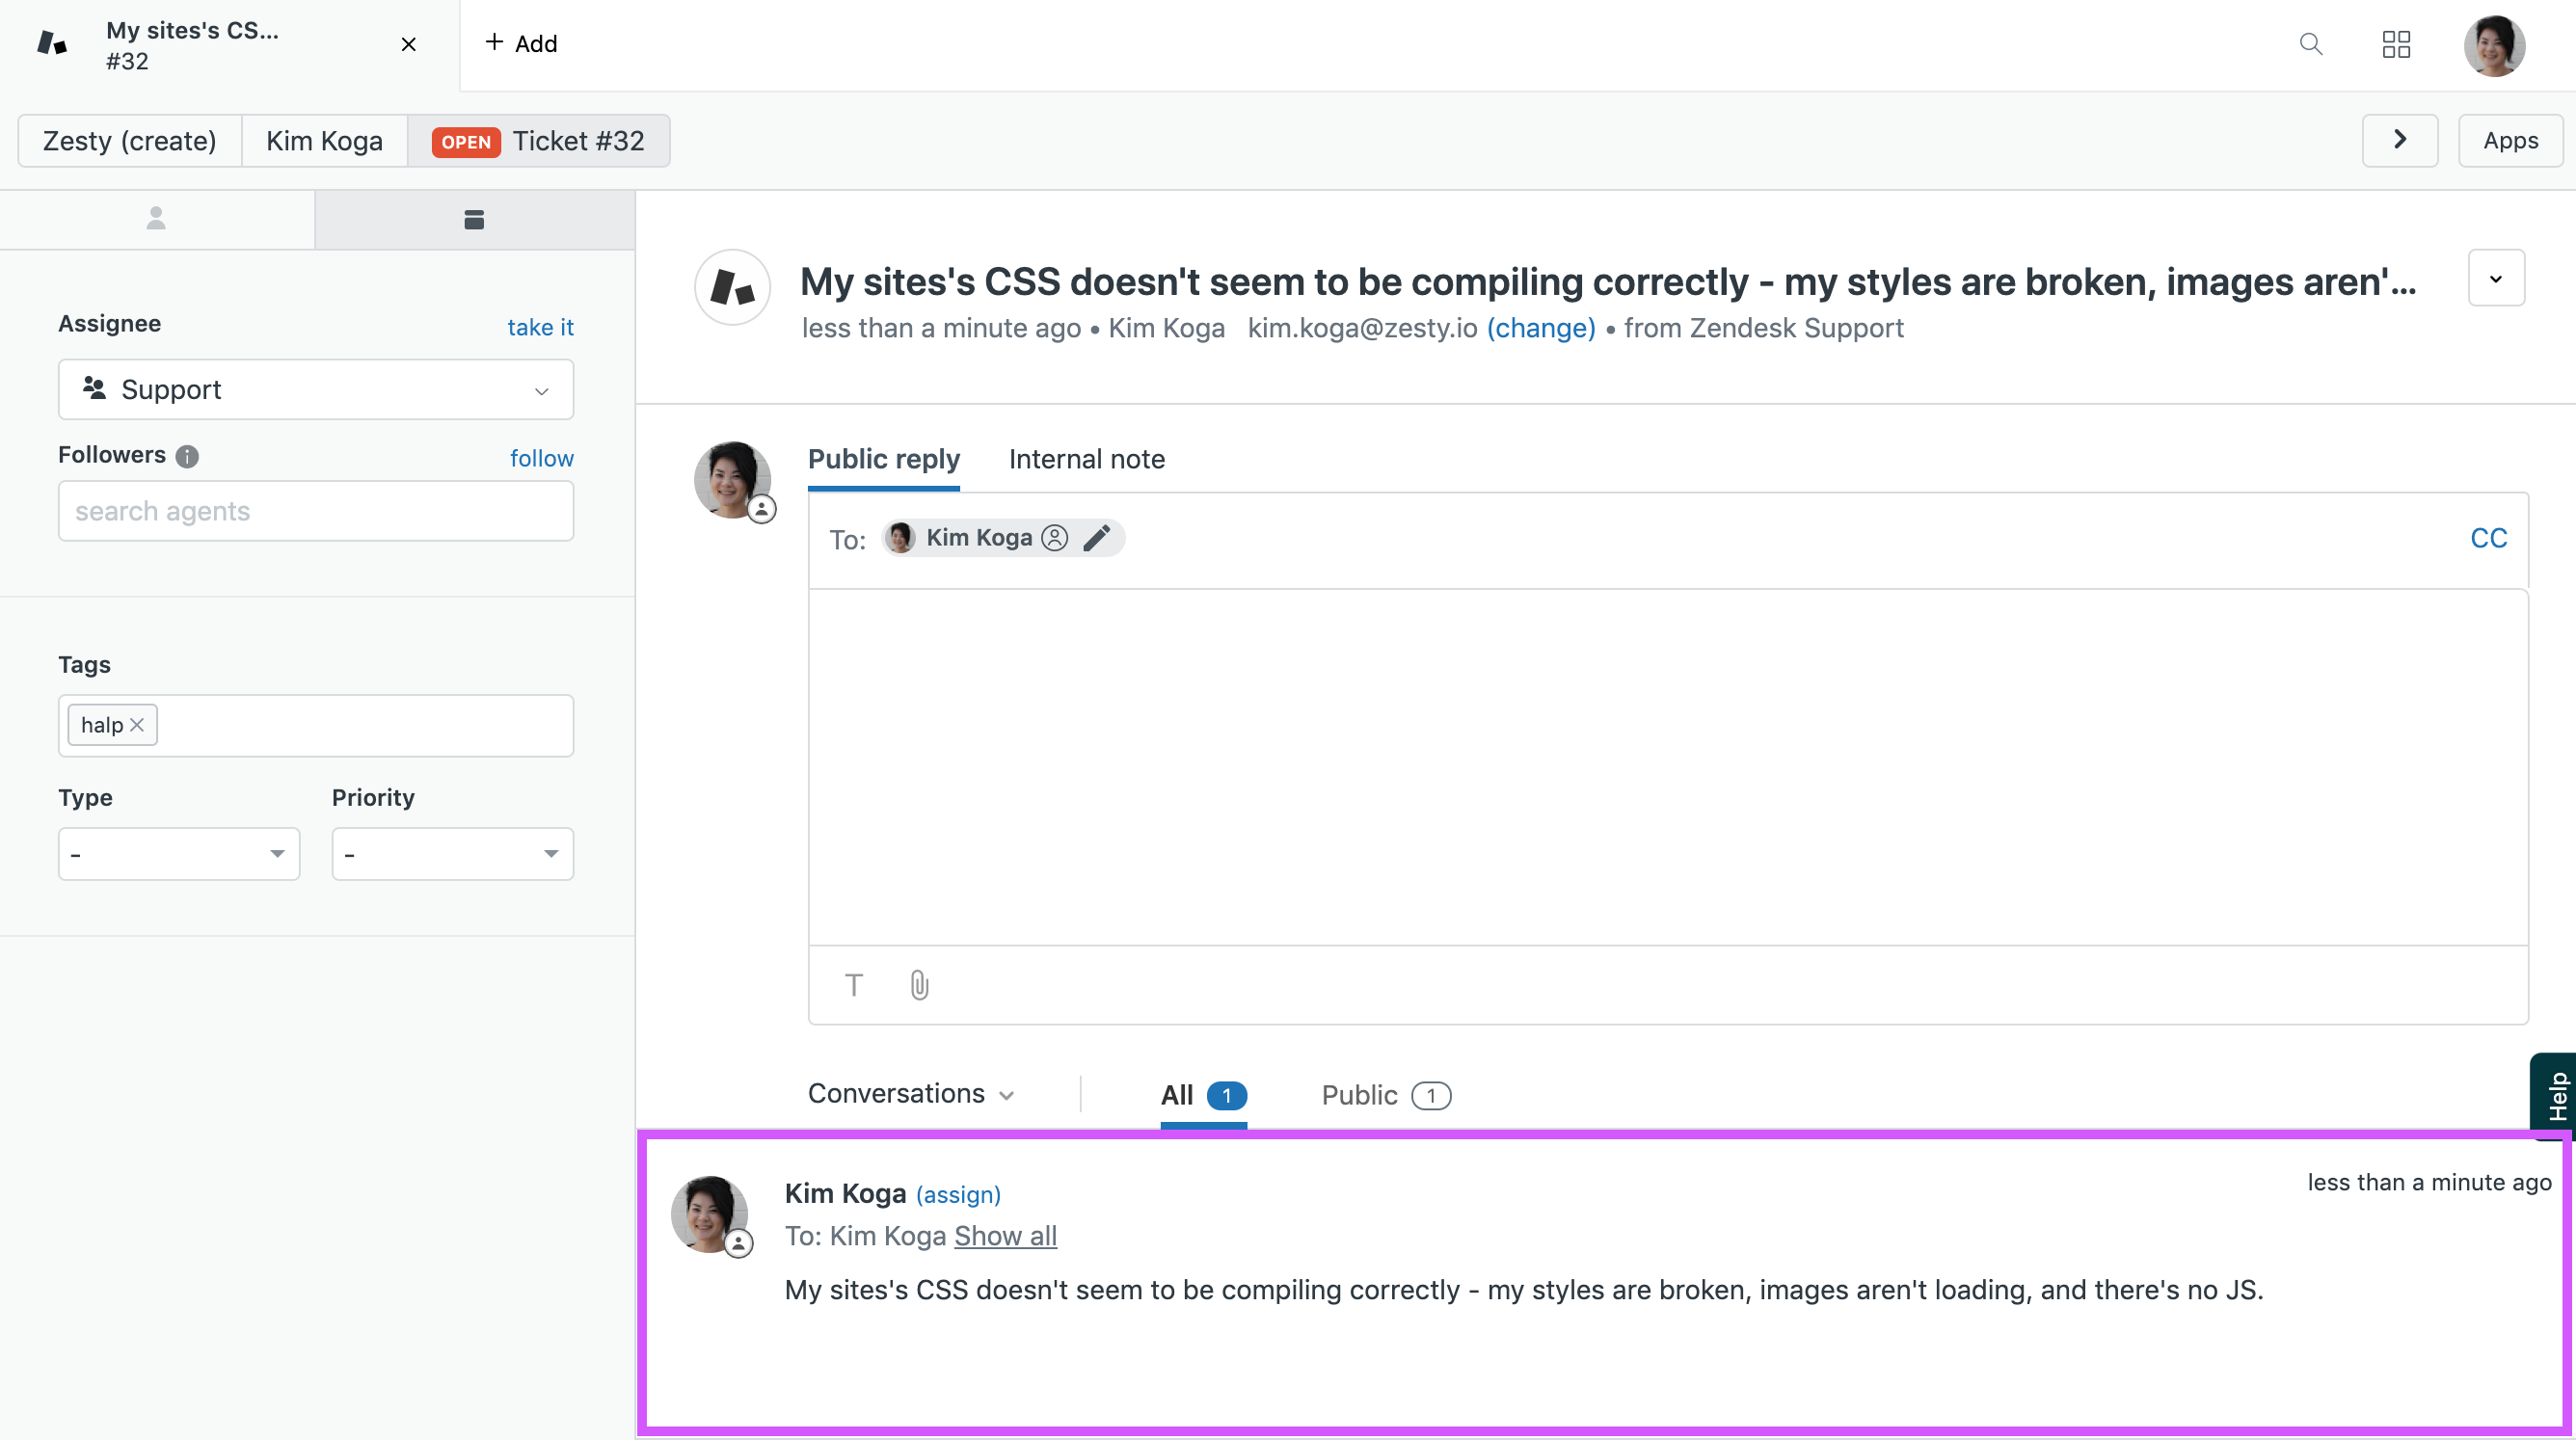
Creating a ticket with the :ticket: emoji
1. React to a user's post in Dev Slack with a :ticket: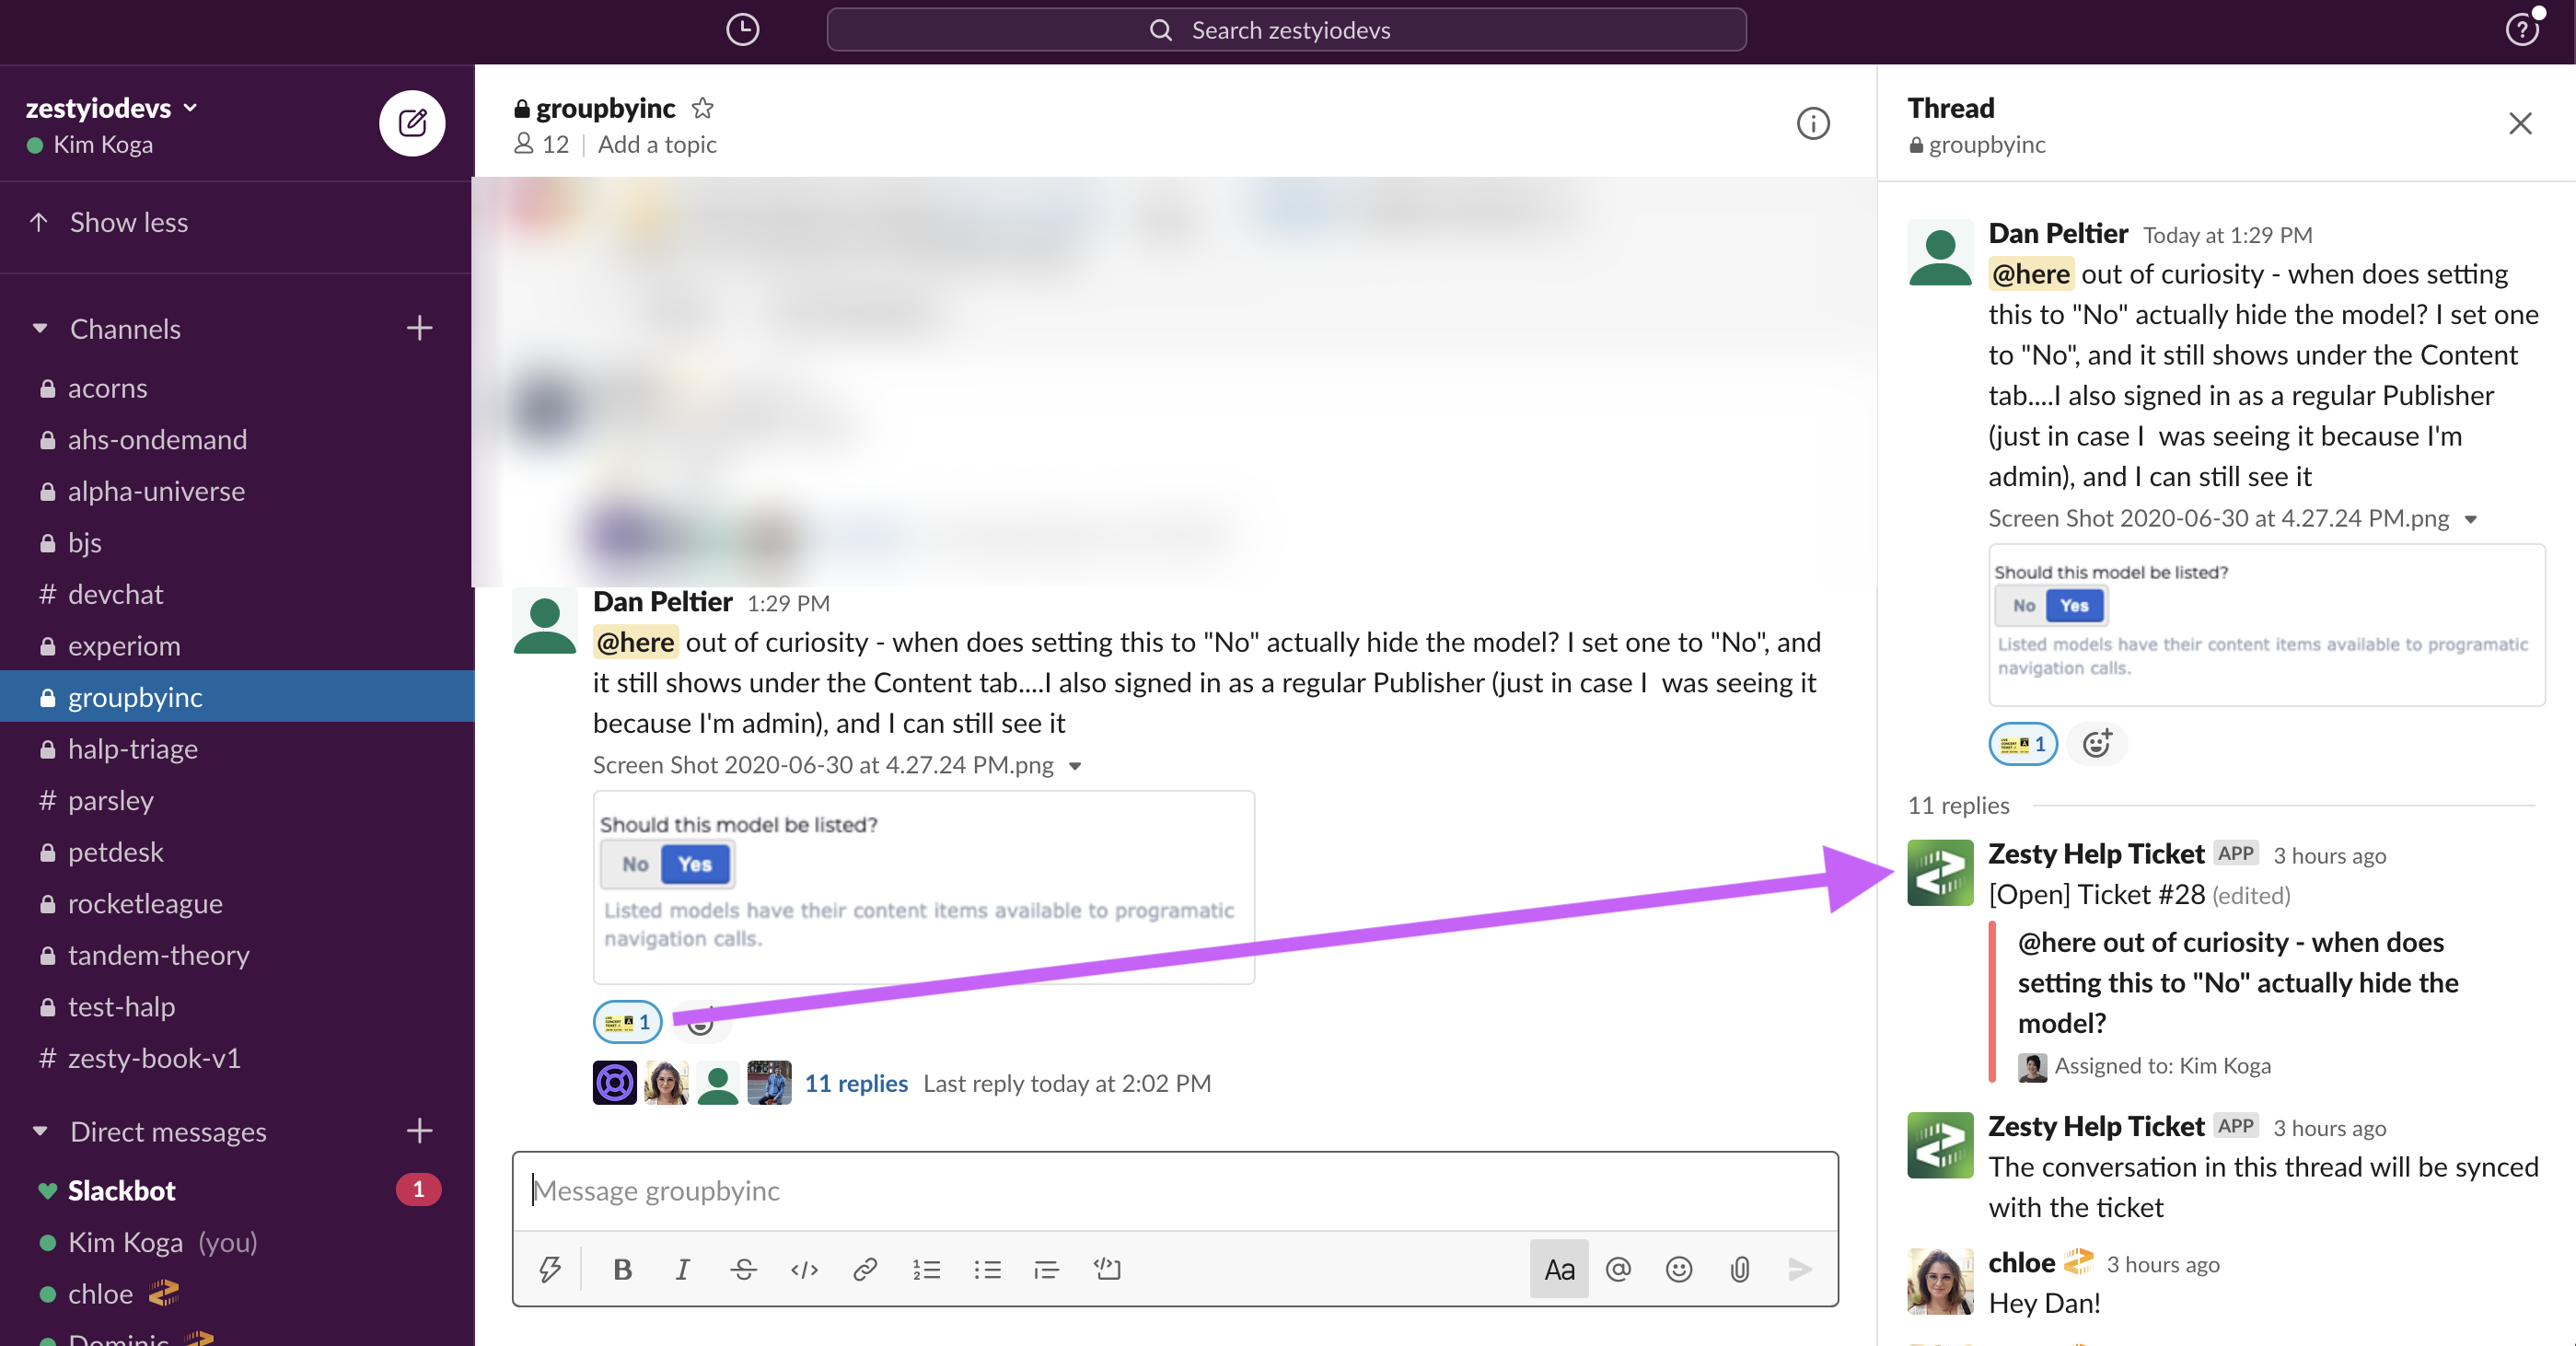
2. Respond to the user under the newly created ticket in a thread that will be synced with their ticket in Zendesk. 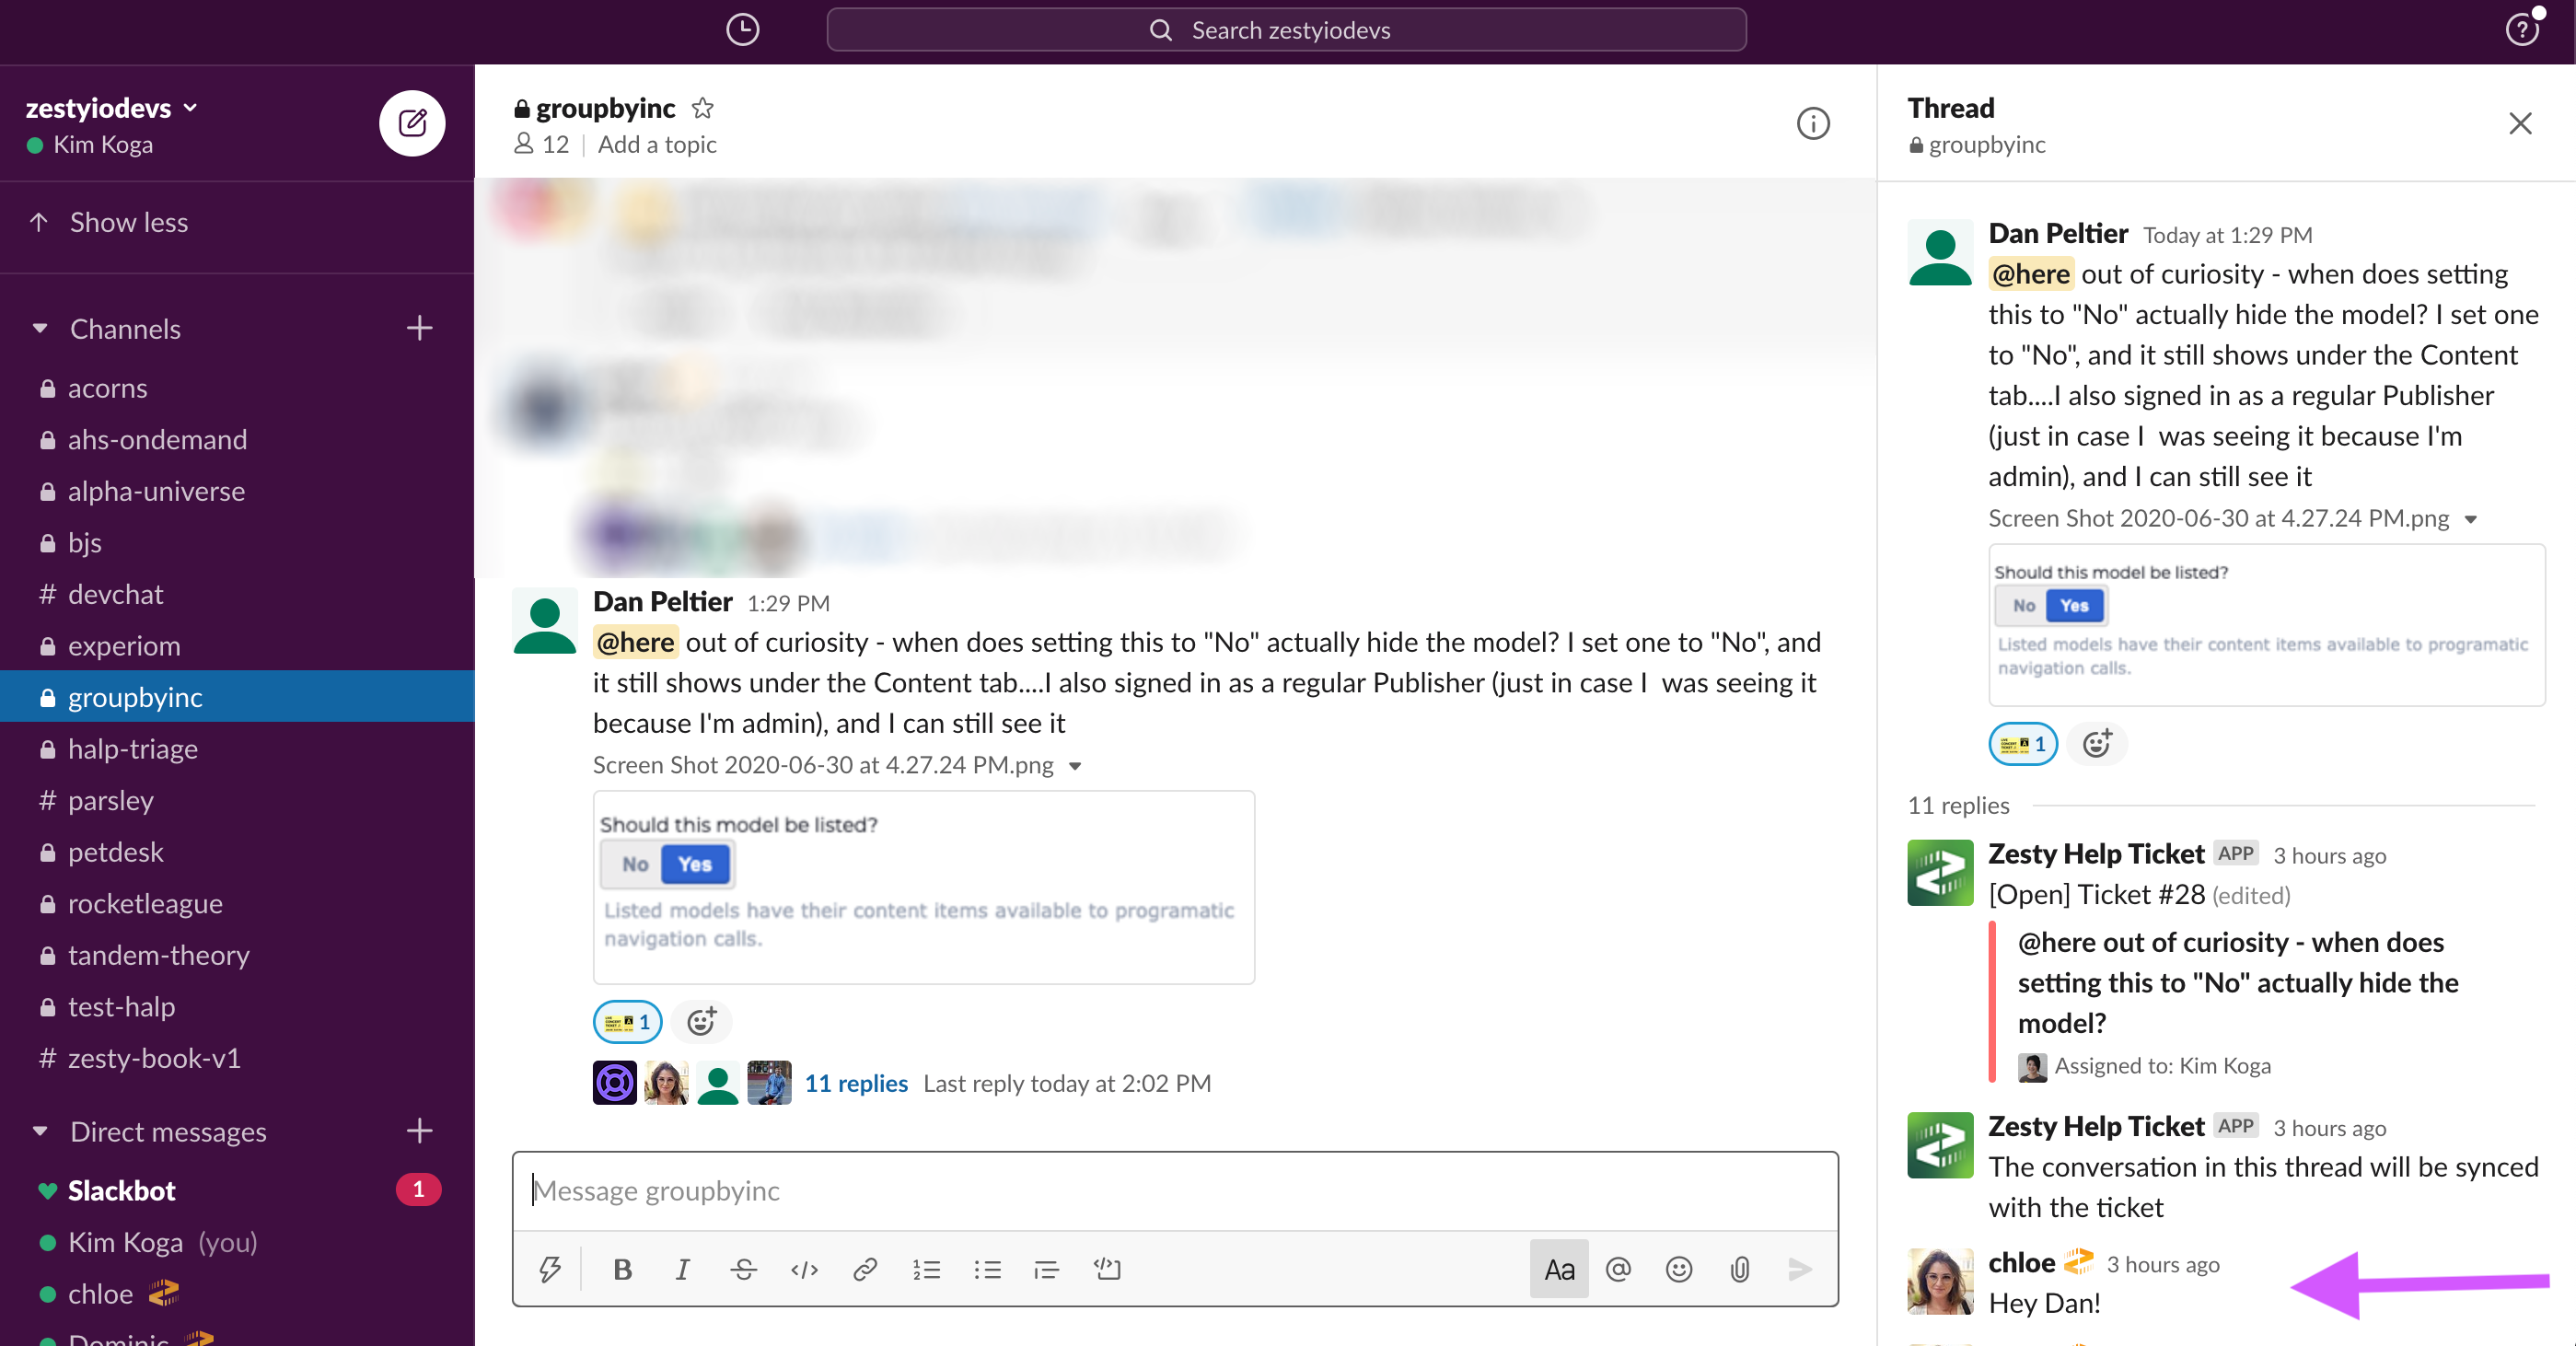
Creating tickets in Zendesk
1. Create tickets in Zendesk by clicking the + Add button at the top of the screen 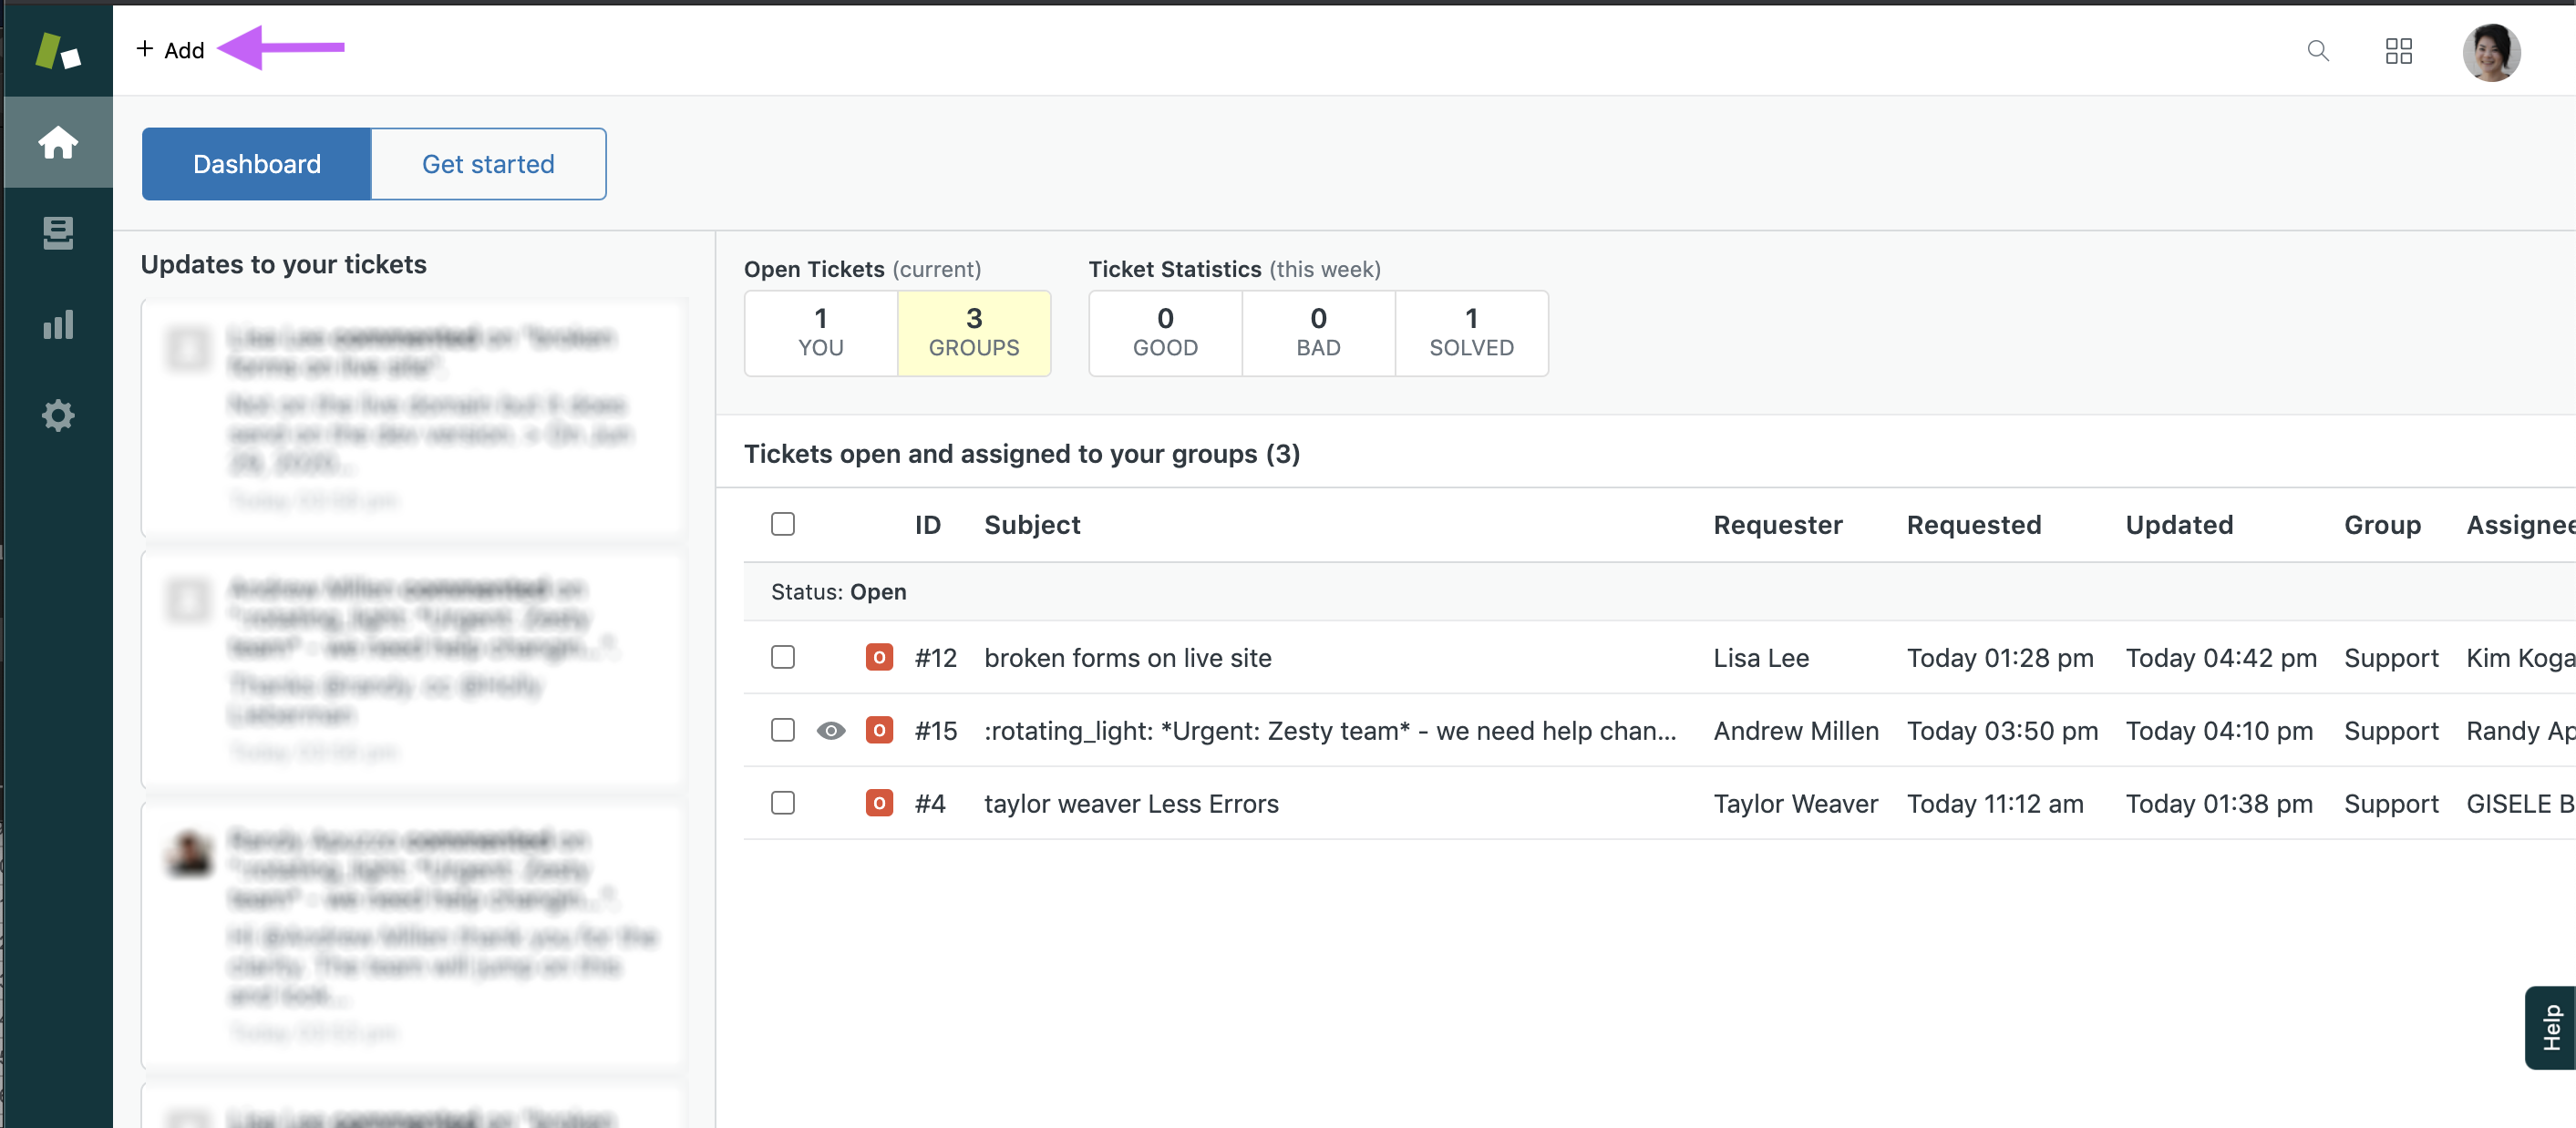
2. Fill out the ticket fields as thoroughly as possible. If there are internal notes that need to be added be sure to toggle the textarea from Public Reply to Internal Note.
Note:* If a ticket is created with an Internal Note only the requester will not be notified that a ticket has been created. If you want both a Public Reply and Internal Note, then create the ticket with a Public Reply and add an Internal Note after its been created.*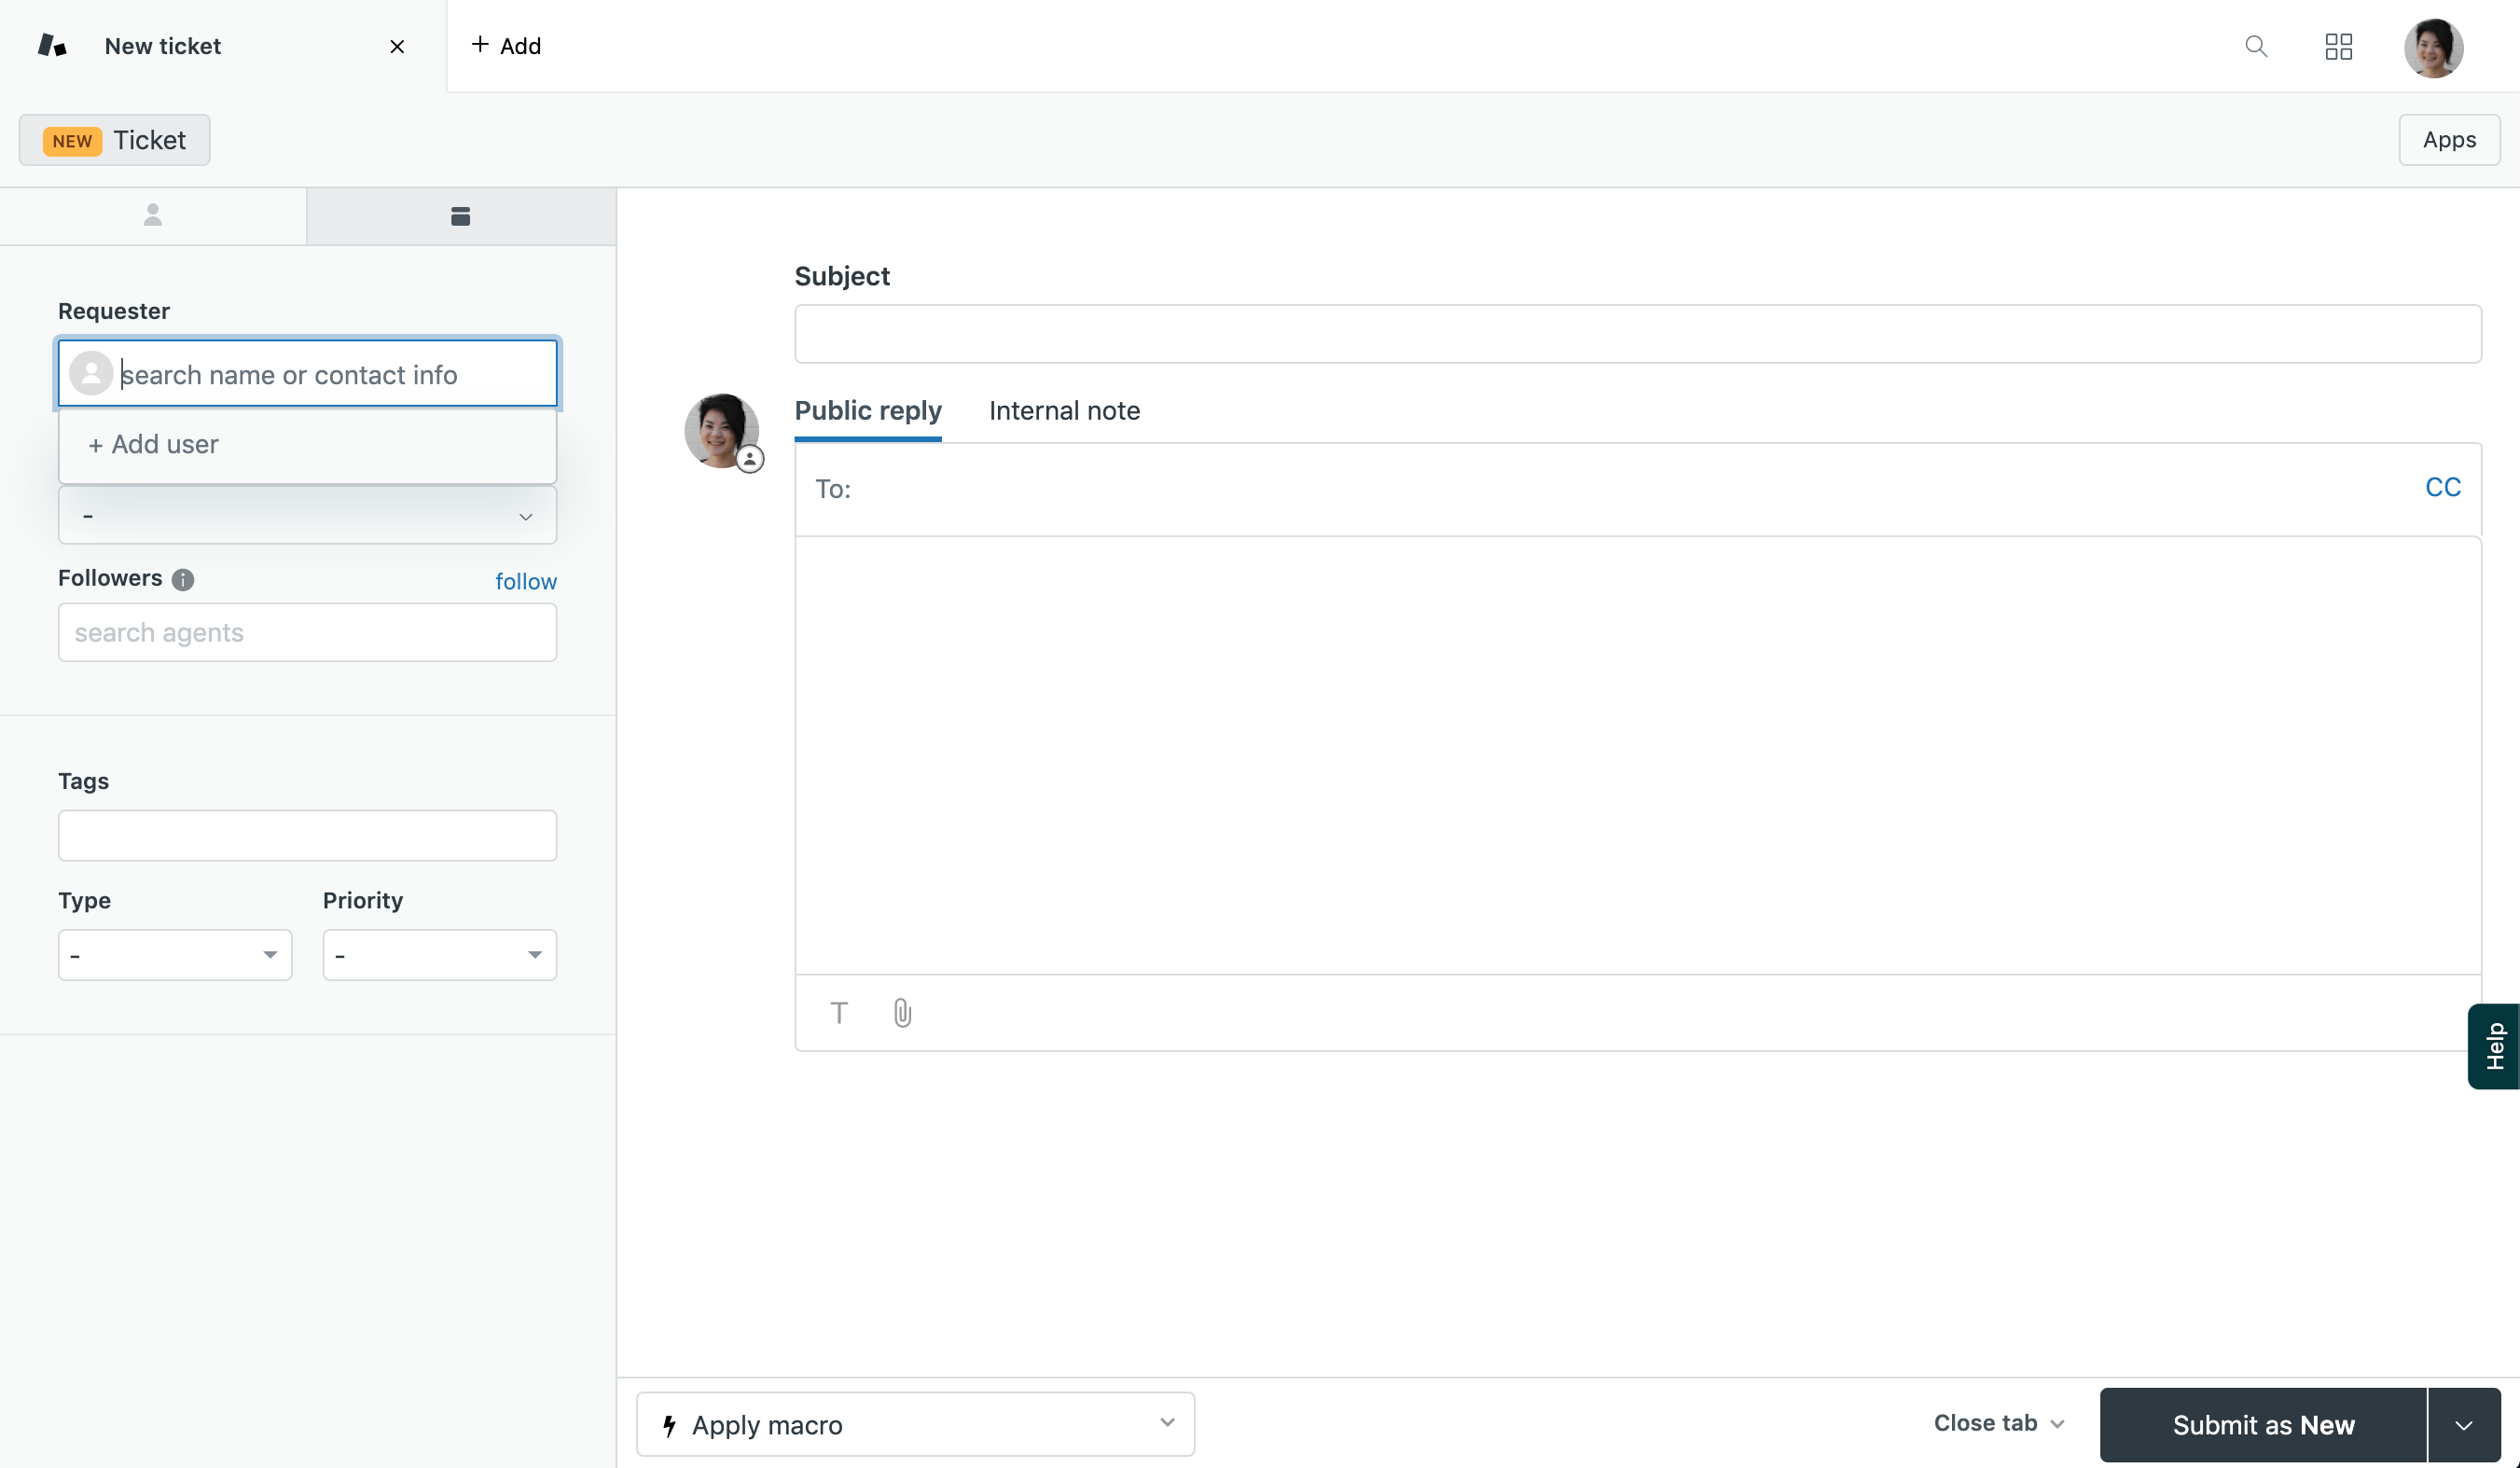
3. If necessary, create an organization. Organizations allow for tickets to be grouped based on the user's email’s domain. For example, tickets from [email protected] would be grouped under the Zesty.io organization and allow agents to view all Zesty.io organization tickets. 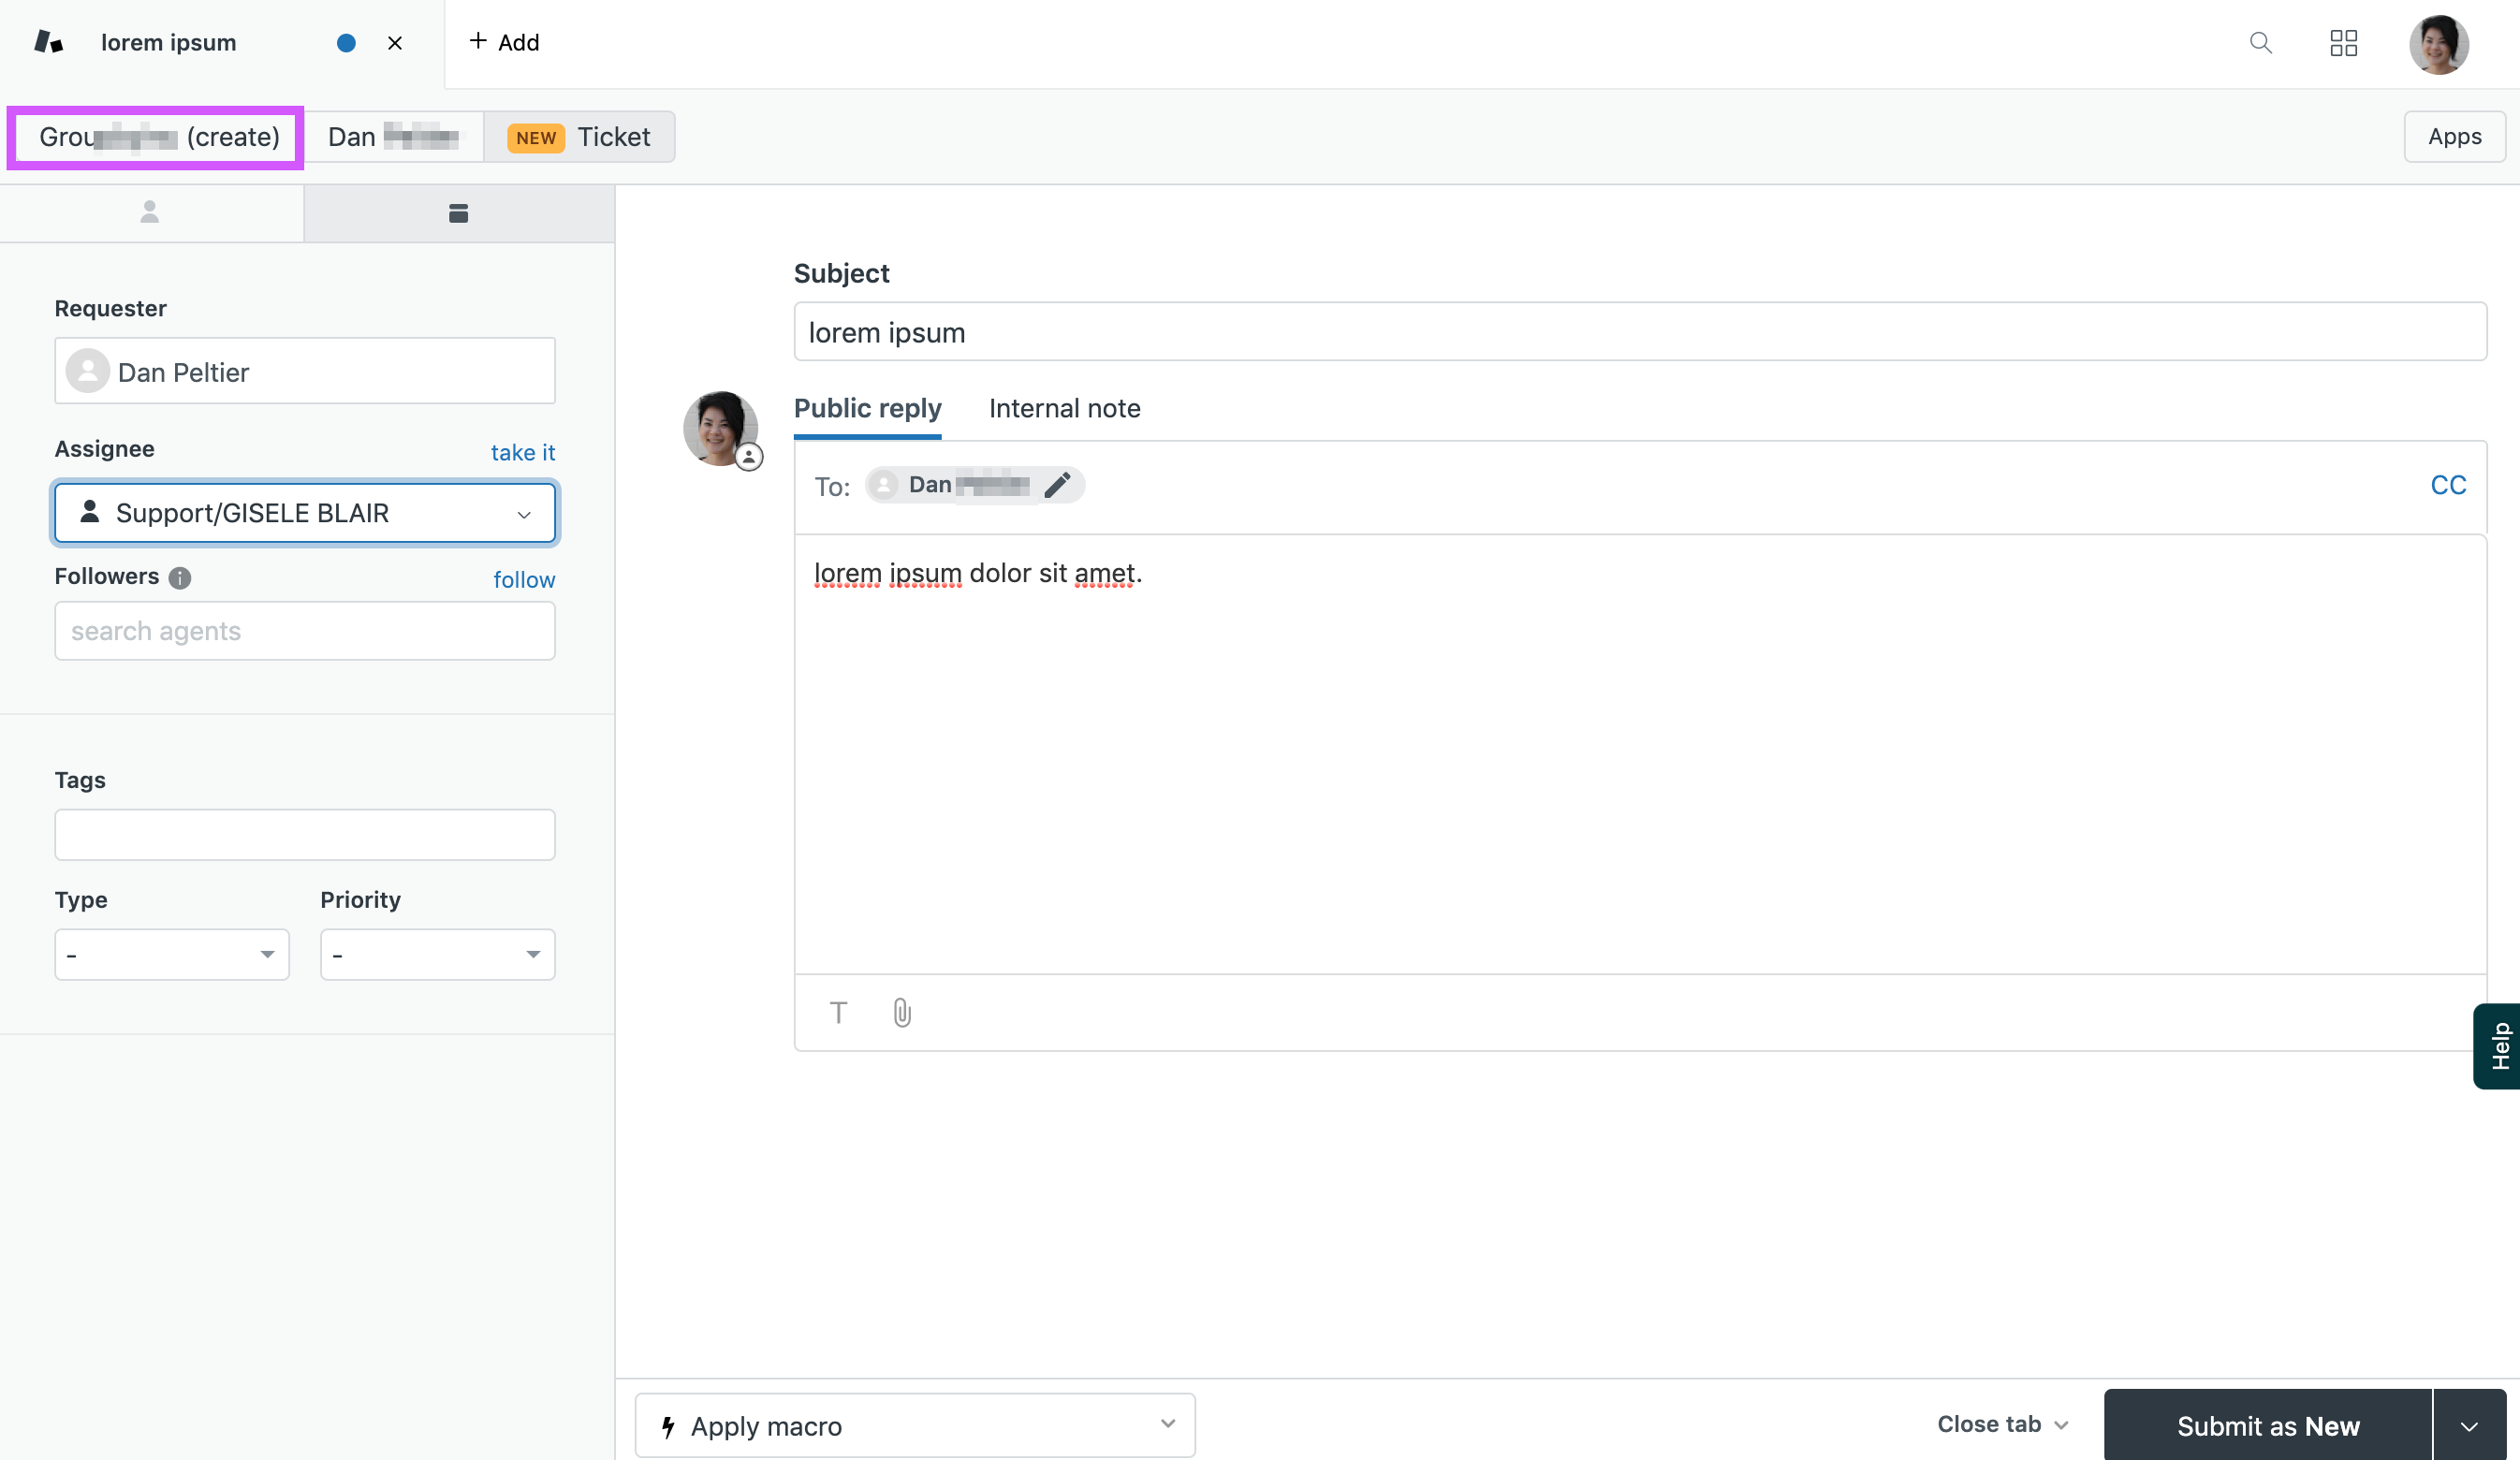
3a. If you opt to create an organization, simple click the Organization tab, fill out the modal, and click "Save". 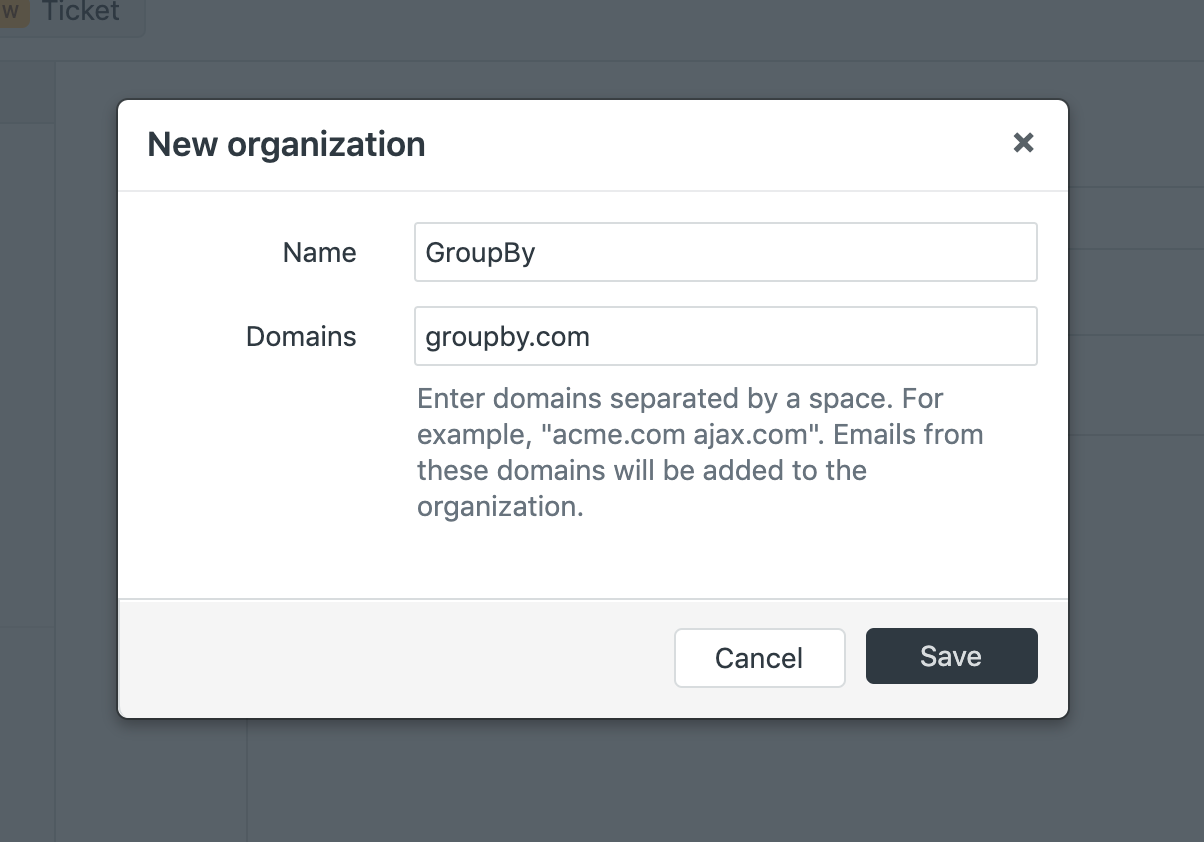
4. Once the ticket is complete - set ticket status if necessary by clicking the small triangle next to the submit button. As soon as the user selects a status the ticket will be created. If you don’t know which status to pick, leave the ticket's status set to its default: New. 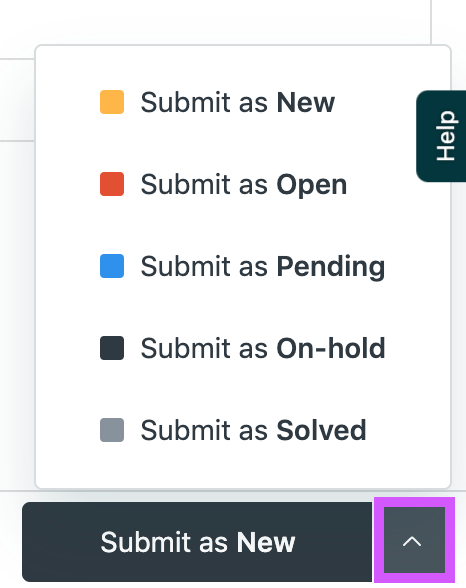
4a. Or click the black "Submit as New" button at the bottom right-hand corner of the screen. 
Using Halp in Slack
Threads in Slack
After a ticket and thread has been created in Slack respond on that thread (as shown in the image above). If you are not a Zendesk Agent and need to add information to the ticket as an internal note, please notify the main agent in the Slack thread via DM.
The video below shows a very brief overview of how to use threads. Please note all replies on a Halp-tracked thread will be synced with the Zendesk ticket. Aside from conversing on the thread in Slack, Zendesk agents also have the option to reply using the Zendesk interface.
Managing Tickets
Managing Tickets in Zendesk
Navigating Zendesk's agent interface
Learn about navigating the agent interface with this Zendesk article.
The following video offers a brief overview of the Zendesk interface. Please read the Zendesk article (linked above) for instructions on the interface.
Setting Ticket Status
Before Setting the status of a ticket be sure to know that those statuses mean:
New indicates that no action has been taken on the ticket. Once a New ticket's status has been changed, it can never be set back to New.
Open indicates a ticket has been assigned to an agent and is in progress. It is waiting for action by the agent. You can view all open tickets using the Open tickets view.
Pending indicates the agent is waiting for more information from the requester. You can view all pending tickets using the Pending tickets view. When the requester responds and a new comment is added, the ticket status is automatically reset to Open.
On-hold indicates the agent is waiting for information or action from someone other than the requester. It is similar to the Pending status in that you as an agent can't proceed with resolving the ticket until you receive more information from someone else. However, the On-hold is an internal status that the ticket requester never sees. While a ticket is set to On-hold, the requester sees the status as Open. On-hold is an optional status, and can be enabled by an administrator as described in Adding the On-hold ticket status to your Zendesk.
Solved indicates the agent has submitted a solution.
Submitting changes to tickets
Whenever changes are made to a ticket the changes are saved by 'submitting' the ticket. Click the Submit button to save any changes to the ticket including new/removed tags, added followers, updated requester, etc. 
Internal Notes
You cannot add internal notes in Slack. Add internal notes in Zendesk. If you are not a Zendesk agent and need to add a note, ask an agent to add a note for you. 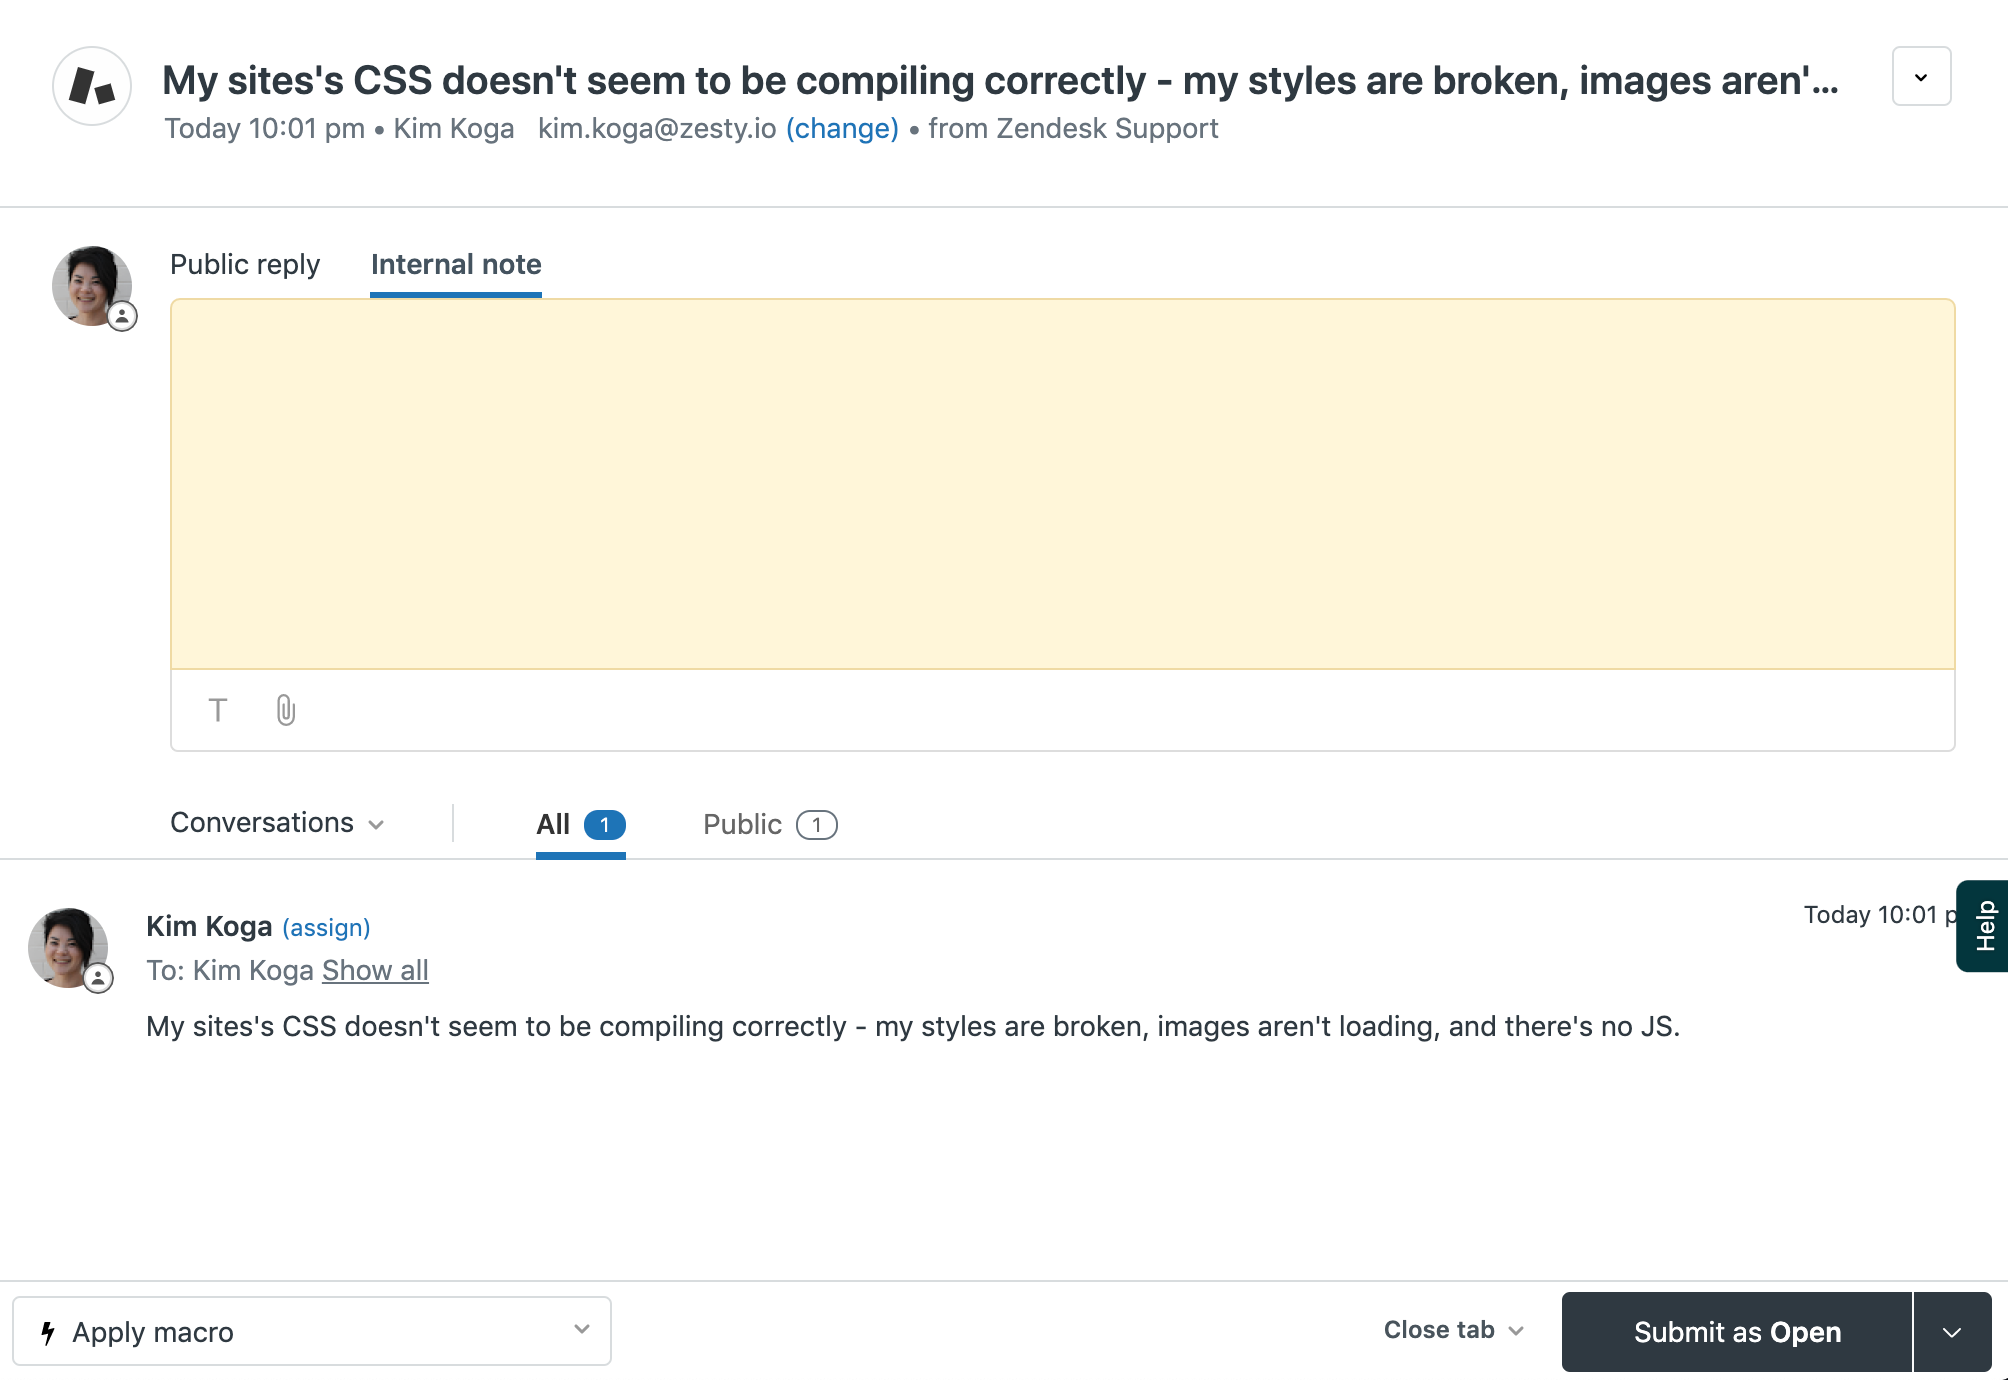
Links to Github/Monday
In lieu of an integration, add links to related Github Issue and Monday Pulse(s) in Internal Notes on Zendesk tickets for the time being. Add Github and Zendesk links to Monday Pulses as well, and same with Github. This means that everyone will have the knowledge of where to go to close a ticket, where to look for a PR (pull request), and when to close a Pulse in Monday. We are actively looking to create an integration across all of our services to automate this process.
Creating tags
Zendesk agents can create tags on tickets using the tags interface that's located in the left-hand column that's next to the main ticket portion of the screen. If the tag has multiple words each word will need to be separated by an underscore for example: my_new_tag. New tags are created and added by typing directly in the tag textbox. 
Tracking time with Tempo
Tempo is a third-party extension in Zendesk. This allows us to track out time. When tracking your time in Zendesk adhere to the following guidelines.
- For times under 15 min input time by rounding in 5 minute increments. For example 3 minutes should be rounded to 5 minutes.
- For times up to and over 15 minutes, round your time to 15 minute increments for example 40 minutes should be rounded to 45 minutes.
- Categorize time as follows
- Support: no category
- Developer: Billable
- Accounts: add description note: "accounts"
Support indicates work done by Support Engineers (Kim and Gisele)
Developer indicates work done by the Engineering team (Randy, Stuart, Josh, Chris, Mukesh)
Accounts indicates work done by the accounts and operations side (Dominic and Jon )